Welcome to the first in a 3-part series over Red Hat’s Identity Management product, or otherwise referred to as “IdM”. In this post we’ll be going over the generalities of Red Hat IdM, how to install and configure it, building an IdM lab to use later, and next steps. Part 2 will be over “Integration with Windows Active Directory (AD)” and part 3 will be regarding “Extending Red Hat IdM with SSO.” There will be follow up Ansible playbooks that will help with a IdM deployment and to seed the services for lab purposes.
General
Red Hat Identity Management is an enterprise-grade identity, policy, and authentication platform application stack. That actually brings me to the upstream project called FreeIPA. They’re both a culmination of multiple technologies to support all the underlying services for the flexibility, integration, and security required to deliver a unified solution. The value delivered is centered in a centralized identity and authentication store similar to Windows AD, which can also be integrated with Windows AD, and many other end-points such as your network devices and web applications.
Why
In many Windows environment deployments a centralized authentication service provided by Active Directory is common place and almost inherent. Most people don’t even think about it, they just “log into their computer” with their “username and password.” On the other side of the fence I still to this day see many *nix environments that don’t have the same capabilities and much less extend them out to other networked devices such as routers and switches. Even worse are the environments that handle shared users and password updates through a spreadsheet!
Which brings me to the next point…why even share credentials? There’s been a solution and it’s one word: sudo. Which you can extend through the network via IdM (the LDAP part). Equifax was subject to issues with shared passwords and default credentials and now more or less everyone in America got Equifux’d. How accurate do you imagine their “auditing” was? How stringent are their policies?
Ever manage more than 10 systems and find yourself with difficulties in creating, culling, and updating credentials in what are essentially disparate systems? I have an “algorithm” to my password schemes for some development systems in my homelab and even then it’s difficult to remember what my credentials are. Before you ask or call me an admitted hypocrite my “production” and “staging” systems are all attached to IdM/AD, ha!
With each passing day security base lines are bolstered and raised, standards are improved, and access requirements made more dynamic. Respond proactively with a platform that can boast FIPS certified identity, access with Smart Cards such as CACs, and role based authentication control extending deeper into your network than before with an easy to manage interface.
What
Red Hat IdM is included in any version of Red Hat Enterprise Linux since 6.2. The related project is FreeIPA and they are both very similar. Both provide usage of DNS, NTP, 389 Directory, Kerberos, LDAP, and many other technologies as a whole but can also be very flexible in extensions and modifications. You can spin up a VM and deploy it right now, but if you’re planning on doing so in any production environment there are a few considerations to be made such as integration with other NTP peers on the same stratum, DNS forwarding, service replicas, and the list goes on. If you’re not comfortable with some of these technologies and how they play a larger part with other nodes and services in your enterprise, simply reach out to your Red Hat Partner for assistance and they’ll be happy to engage a Solution Architect or engage consulting services.
Outside of that, a few key features and functions provided by Red Hat IdM that are advantagous in a production environment are…
- Operating as a Certificate Authority to provide identity to nodes, services, and users
- Centrally managed users, groups, shared mounts, SSH keys, and additional points of integration
- Web GUI (yes!) and command line tools (excellent!)
- Smart Card integration with the OpenSC driver
- Cached log-ins. Think of when you take your work laptop off the dock, and how you can still unlock it on the bus home even though you’re not communicating with the internal Active Directory server
- Host, service, and role based authentication and policies
Where
For the purpose of this article, we’ll assume you have either…
- Bought RHEL from the Red Hat Webstore
- Bought RHEL from your Red Hat Partner
- Have a Red Hat Developer Subscription
Either works perfectly fine as long as you have a RHEL machine to work with be that a physical server or a virtual machine. Now, you *could* deploy this on a RHEL VM in a public cloud service such as AWS and use it with an internal network. However, the case with that would be a more detailed process involving a site-to-site VPN tunnel to connect networks and offer services securely so we’ll skip that for today. Let’s just go with the notion that you have signed up for the Red Hat Developer Subscription and are now installing RHEL 7.5 into a couple VMs in VirtualBox or VMWare Workstation…
In my specific use case and what I’ll be doing for this lab is I have a Dell R210ii setup with Proxmox as a hypervisor, pfSense providing my routing and forward DNS services, and two RHEL 7.5 VMs, all on that same host with the RHEL VMs obtaining IPs from the pfSense router.
How
The process of getting the basics up and running is pretty simple. There’s a stack to install on the IdM server(s), and there’s a small application to install on the clients. Then of course the configuration of the server components, and the simple binding of the client to the server. Now, you could also create replica servers, segregate services into different systems and so on but that’s a bit outside the scope of this specific article and we’ll get into some of that soon enough.
Get this show on the road
Alrighty, let’s start building this IdM lab out.
Architecture
Ok so let’s start with what we need to keep in mind from an architecture standpoint…
- First and foremost, DNS. You need a FQDN, and for the purposes of this series (most deployments) a subdomain on that FQDN. For this purpose, I’ve used the kemo.lab domain and the subdomain idm.kemo.lab. The DNS and domain scheme is important because if you set the domain realm to the root of your TLD (kemo.lab) then you’ll never be able to create cross-forest trusts. Now keep in mind that these don’t need to be publicly set, they can be provisioned with an internal DNS server before having external requests forwarded out.
- Next, DNS. Yes, really, again. Something to make mention of is the delegation of DNS services, in that having your IdM infrastructure on a subdomain (idm.kemo.lab) makes it easier to provision SRV records, and forward the rest of the requests up your DNS chain.
- Systems need to be on the same logical, routed network. You can connect different networks in different geographies together of course, but that involves more network engineering. For this example, let’s assume you have two VMs running on your computer behind a NAT, VM1 (server) is 172.16.1.100 and VM2 (client) is 172.16.1.101.
- We’ll be setting up a Certificate Authority (CA), which means we should think about our Public Key Infrastructure (PKI) hierarchy. For this purpose, let’s just setup a root CA called “My Awesome CA.”
Outside of that, there are no real architecture considerations to make mention of for the purpose of this article series. In a real production environment you’d want to set up replica trusts, additional DNS services, IPv6, etc. I suggest following the Red Hat Identity Management Installation Guide as well for additional information.
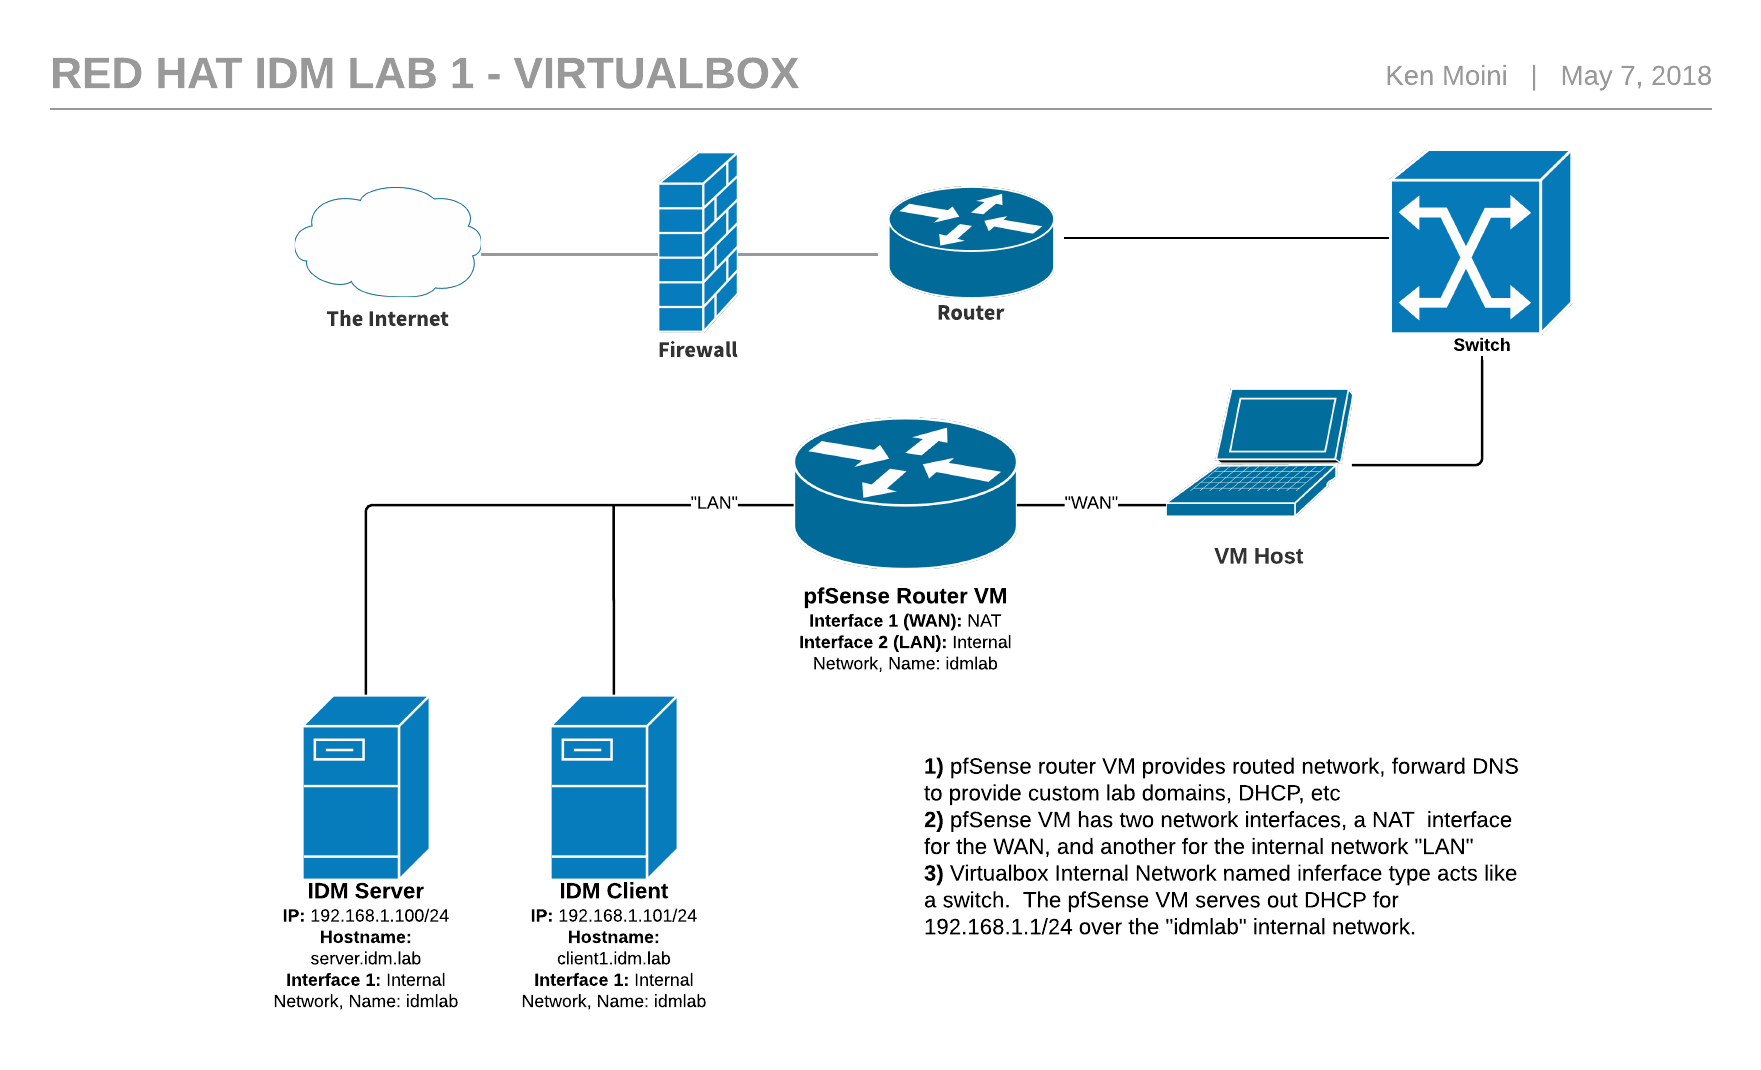
To review, I’ll be deploying this lab in VirtualBox on my Galago Pro. There are 4 VMs total:
- pfSense Router VM – This provides the routed network, has a NAT interface for the “WAN” and another network internal interface named “idmlab” for the “LAN” providing out to the lab
- RHEL 7.5 VM – IdM Server
- RHEL 7.5 VM – IdM Client
- Desktop VM – OS of your choice, just need a browser to access the GUI of your pfSense router and IdM Server Web UI.
In the future we’ll be expanding this environment out with a replica, Windows Active Directory environment, and more. See the diagram below for an example of this lab.
Run
Because we want to keep this as action packed, informative, yet as succinct as possible here’s a few commands to run…
IdM Server
Set firewall
[code lang=”bash”] # systemctl start firewalld.service # systemctl enable firewalld.service # firewall-cmd –permanent –add-service={freeipa-ldap,freeipa-ldaps,dns,ntp,https} # firewall-cmd –reload [/code]Install packages
[code lang=”bash”] # yum install ipa-server ipa-server-dns [/code]Run the installation command
[code lang=”bash”] # ipa-server-install [/code]Now the next few prompts will be dependent on your environment so reference the Installation Guide and answer accordingly. In this case, we’ll be using the integrated DNS services, on the ipa.idm.lab realm/domain, and forwarding to our router’s DNS. Next, test the implimentation by authenticating to the Kerberos realm with…
[code lang=”bash”] # kinit admin [/code]If everything checks out then we can proceed to configuring the client(s)!
Client(s)
Of course you can connect many different kinds of clients to the setup right now, be those Linux hosts, network devices, etc. For right now, let’s focus on our other RHEL VM. Log into the machine as a privileged user, and run the following commands, the first of which will install the client software needed and the second will start the binding and configuration process…
[code lang=”bash”] # yum install ipa-client # ipa-client-install [/code]Just like the server configuration, there are some prompts and questions to answer (domain, realm, hostname, etc) and you’ll shortly be connected to the IdM Server! There are many client configuration options so be sure to browse the Install Guide for the client section as well. After binding the client, do a test against the Kerberos realm…
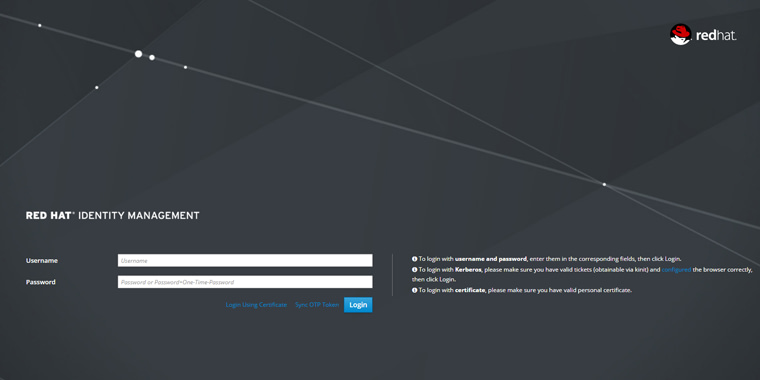
[code lang=”bash”] # kinit admin [/code]Wait, we’re now connected to the IdM server but there are no users to authenticate with! (aside from the admin user) Let’s navigate back to the IdM server with our web browser and access the GUI from there. Simply load the hostname/IP address of the IdM server in your browser.
Next Steps
Now that we have the IdM Server setup and a client bound and configured there’s plenty we can do next. From the web panel you can gleam some of the functionality offered by Red Hat Identity Management. I won’t go into the process of adding users, groups, and so on for basic identity management since that’s pretty basic and easy to do. We’re also reaching the end of this article, but before I wrap up I do want to make mention of a few features…


There are plenty of other tasks IdM can perform such as authentication with Smart Cards, automount shared resources, extend the functionality with the included API, and more. For now, we have the basic constructs of an Red Hat Identity Management environment deployed. We’ll come back in the next article of this series with some steps on how to expand your IdM environment with replicas and AD trusts. If you have any feedback or questions we’d love to hear from you in the comments, or if you’re interested in learning more about Red Hat Identity Management we’d be more than happy to talk with you.